
Location -> Overview
Operation at several locations |
The bintec Hotspot Solution™ allows operation of a Hotspot across locations. The Hotspot user tickets can be managed in a centralised or decentralised manner. It is possible to generate tickets which are only valid for a specific location, as it is possible to generate tickets that are valid for all locations.
As is generally known, the Hotspot server is centrally located and identical for all bintec customers (clients). Detection of which client is communicating with the Hotspot RADIUS server occurs over the so-called domain. At licence activation, this domain is issued over the licence portal (www.bintec-elmeg.com Service & Support->Product Licencing -> HotSpot Licencing ) and entered at configuration of the bintec RS353xx™. In the case of a solution with several locations, this domain is identical for all locations.
In order to nevertheless allow differentiation of locations, the RadiusNasld parameter is introduced.
After you log in with your access data at https://hotspot.bintec-elmeg.com, all configured locations are displayed in the Location -> Overview menu.
Location -> Overview
Click Upload Manager in the Location menu to upload your company-specific terms and conditions, for example.

Upload Manager
Click >Help< for information on how to use the upload manager.
In Location overview select a Location . A detailed view of locations is now displayed. Here, you can edit Location.
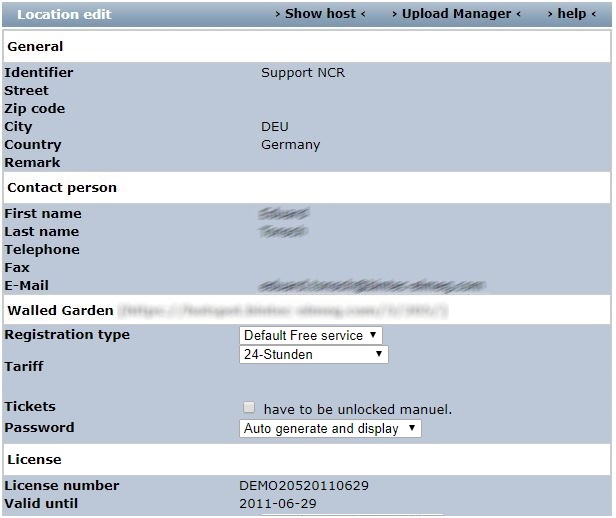
Location edit
In the Location edit menu, you also have the option of switching to Show host.
Go to Show host.

Show host

|
Note |
|---|---|
|
Note that you can only use a tariff for a special location, if a NAS identifier is set here and entered in the gateway too. |
|
If no NAS identifier is displayed, you can set it under New host.
If you now create an Account or a Voucher, under Location you can select a location or All .
If you select All the account is valid for all locations.
Go to Voucher -> New voucher to create a voucher.

New voucher
Fill in the mandatory fields Quantity, Tariff and Location.
Proceed as follows:
Enter 100 for Quantity, for example.
Select a Tariff, e. g. 2h Ticket . The rate selection can be extended by your administrator.
Under Location select All .
Confirm your entries with Submit.
| Copyright© Version 01/2020 bintec elmeg GmbH |