-
Go to LAN -> IP Configuration -> Interfaces -> <en1-0>
 .
.
Configuration of the VPN gateway |
In this example, the VPN gateway is operated with IP address 192.168.0.30 . To assign the bintec secure IPSec client™ an IP address from this network range, the option Proxy ARP must be enabled.
For this, go to the following menu:
Go to
LAN -> IP Configuration -> Interfaces -> <en1-0>
 .
.

LAN -> IP Configuration -> Interfaces -> <en1-0>

Relevant fields in the Interfaces menu
| Field | Meaning |
|---|---|
| IP Address/Netmask | With Add, add a new address entry and enter the IP Address and corresponding Netmask of the interface. |
| Proxy ARP | Enable the option Proxy ARP. |
An IP address pool is specified in the IP Poolsmenu, from which an address in assigned all VPN clients at tunnel setup. In our example, a range from the local network is selected, e.g. 192.168.0.150 to 192.168.0.180 .
Go to VPN -> IPSec -> IP Pools -> Add.

VPN -> IPSec -> IP Pools -> Add
Relevant fields in the IP Pools menu
| Field | Meaning |
|---|---|
| IP pool name | Enter the name of the IP pool, e.g. pool . |
| IP pool range |
In the first field, enter the first IP address from the local network. In the second field, enter the last IP address from the local network. |
For VPN IPsec authentication, a PKCS#12 certificate was generated for each of the bintec secure IPSec clients™ as well as the VPN gateway. The certificate of the VPN gateway is imported over the Certificate List Menu.
Go to VPN -> Certificates -> Certificate List -> Import.

VPN->Certificates->Certificate List->Import
Relevant fields in the Certificate List menu
| Field | Meaning |
|---|---|
| External Filename | With Browse..., select the file path or data name of the PKCS#12 certificate. |
| Local Certificate Description | Enter a name under which the certificate is saved in the VPN gateway, e.g. vpn-gateway . |
| Password | Enter the password issued at creation of the PKCS#12 certificate. |
After importing the PKCS#12 container, you see the inserted certificate of the VPN gateway and the root certificate of the certification authority in the certificate list.
Go to VPN -> Certificate -> Certificate List.

VPN -> Certificates -> Certificate List
In the Phase 1 Profile menu, the imported certificate (e.g. vpn-gateway) is then selected as Local Certificate.
Go to
VPN -> IPSec -> Phase 1 Profiles -> Edit
 .
.

VPN -> IPSec -> Phase 1 Profiles -> Edit

Relevant fields in the Phase 1 Profiles menu
| Field | Meaning |
|---|---|
| Authentication Method | Under Authentication Method select RSA Signature . Phase 1 key calculations are authenticated using the RSA algorithm. |
| Local Certificate | This field allows you to select the imported certificate (e.g. vpn-gateway) as local certificate. |
| Mode | With the option Main Mode (ID Protect) it is insured that the data for negotiation of the IPSec Phase 1 are transmitted in encrypted form. |
| Local ID Value | If you enable the option Use subject name from certificate, the subject name of the VPN gateway certificate (in our example: "MAILTO=vpn-gateway@bintec-elmeg.com, CN=vpn-gateway, OU=dev, O=fec, L=nuernberg, ST=bavaria, C=DE") is used as a local IPSec ID. |
Settings in the
VPN -> IPSec -> Phase 2 Profiles-> Edit
 can be taken over
unchanged.

VPN -> IPSec -> Phase 2 Profiles -> Edit

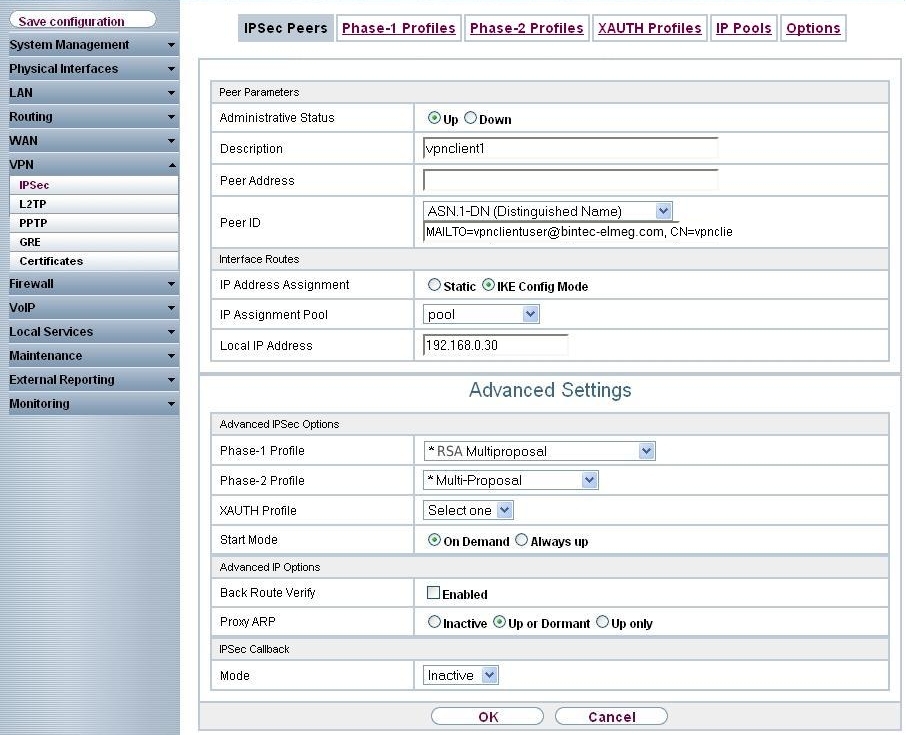
In the IPSec Peersmenu, a VPN connection is set up for every bintec secure IPSec client™.
Go to
VPN -> IPSec -> IPSec Peers -> Edit
 .
.

VPN -> IPSec -> IPSec Peers -> Edit

Relevant fields in the IPSec Peers menu
| Field | Meaning |
|---|---|
| Description | Enter a description of the peer which identifies it, e.g. vpnclient1 . |
| Peer ID |
As
Peer ID the
Subject Name of the VPN client certificate with the type
ASN.1-DN (Distinguished Name)
is saved. This
subject name was issued at creation of the certificates generated for
the
bintec secure IPSec clients™. In this example, for the first VPN peer the
following subject name is saved:
|
| IP Address Assignment |
Here, choose the configuration mode IKE Config Mode off. |
| IP Assignment Pool | Select an IP pool configured in the VPN -> IP Pools menu. |
| Local IP Address | Assign an IP address to the bintec secure IPSec client™. |
The Advanced Settings menu consists of the following fields:
Relevant fields in the menu Advanced Settings
| Field | Meaning |
|---|---|
| Phase 1 Profile | For phase 1, select a profile already configured in the Phase 1 Profiles menu, e.g. RSA Multiproposal . |
| Phase 2 Profile | For phase 1, select a profile already configured in the Phase 2 Profiles menu, e.g. Multiproposal . |
| Proxy ARP |
Set Proxy ARP to Up or Dormant . Your device only responds to an ARP request if the status of the connection to the IPSec peer is up or dormant. In the case of Dormant , your device only responds to the ARP request; the connection is not set up until someone actually wants to use the route. |
| Copyright© Version 01/2020 bintec elmeg GmbH |