Installation of the KOBIL SecOVID ™
Installation of the KOBIL SecOVID server |
The installation program of the
KOBIL SecOVID™ server is launched on the CD by opening the
win32\server\SECOVID Server.exe file. Please read the setup outputs for your information
and follow the instructions and recommendations of the installation routine. At conclusion of the installation routine,
the logfile of the
KOBIL SecOVID™ server should be checked to insure that the server started up.
Installation of the KOBIL SecOVID ™
For installation of the KOBIL SecOVID™ administration tool under Win32 systems, proceed as follows:
Launch the setup program for the drivers of your KOBIL chip card terminal via
/Driver Setup/KOBILDriverSetup.exe
Follow setup program instructions and close the chip card terminal when prompted. The chip card terminal is required to administer the KOBIL SecOVID™ server per remote console. The KOBIL chip card terminal is not required for local administration of the KOBIL SecOVID™ server.
For installation of the
KOBIL SecOVID™ administration tool, the setup program
/win32/admin/Setup_admintools.exeon the installation CD must be launched. At installation,
please follow additional instructions of the setup program.
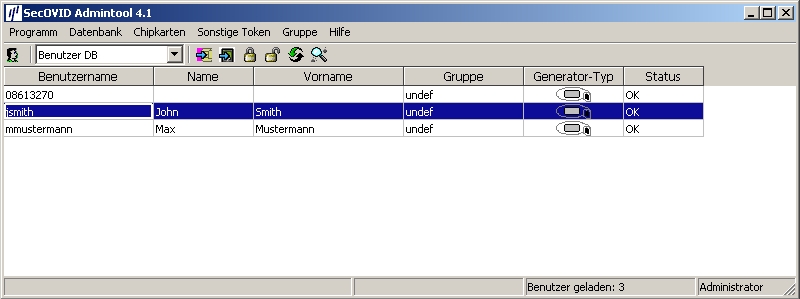
The KOBIL SecOVID™ administration tool is launched over the Start -> Programs -> SecOVID Admintools-> WxOvid menu. After initial startup of SecOVID Admintools, the secret token data can be imported and added to the SecOVID data bank. At a second SecOVID testing, token data are displayed in clear text. If you've bought the SecOVID tokens, the token data are generally provided in encrypted form. Token data import (e.g. tokendata_firm.db) occurs via the Other Tokens -> Import Tokens menu.

Launching KOBIL SecOVID ™ admintools
For assignment of tokens to a user, token sets must be blocked. After temporary blocking of a token data set, user information can be saved by editing the entry. The information in the User Name field is used after configuration of the bintec secure IPSec client™ for advanced IPSec authentication.

User information
The data set must subsequently be unblocked.
Unblock
An initial function test can be performed with the command line tool
radping.exe. With the one-time password,
Radping initiates an authentication request on the SecOVID RADIUS server. During
installation, the tool was saved in the \etc\SecOVID\ directory. With the
-u option, the user name and the one-time password are transmitted to the SecOVID server.
The one-time password must be generated with the user token. The SecOVID server is addressed with the
-Soption. For the first function test,
radping must be executed directly on the server. The RADIUS password is sent with the
-k option. The default value is
secret
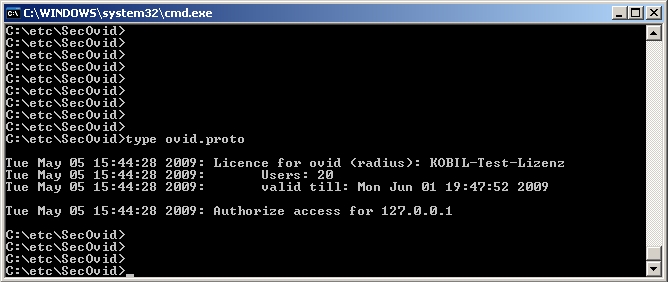
. The SecOVID logfile (\etc\SecOVID\ovid.proto) displays
the following message in case of successful authentication:

Function test
All RADIUS clients (e.g. the bintec VPN gateway, or the test application
radping) must be saved on the SecOVID server as RADIUS client. For this, configuration
file
\etc\SecOVID\clients is edited. In our example, the bintec VPN gateway with the IP address
192.168.0.30 and the RADIUS password radius_PWD is
added. This password is subsequently also saved on the VPN gateway in the RADIUS settings. The SecOVID server service
must be restarted for these changes to become effective.

Clients-Editor
| Copyright© Version 01/2020 bintec elmeg GmbH |