-
Go to LAN -> IP Configuration -> Interfaces -> <en1-0>
 .
.
Configuration of the VPN gateway |
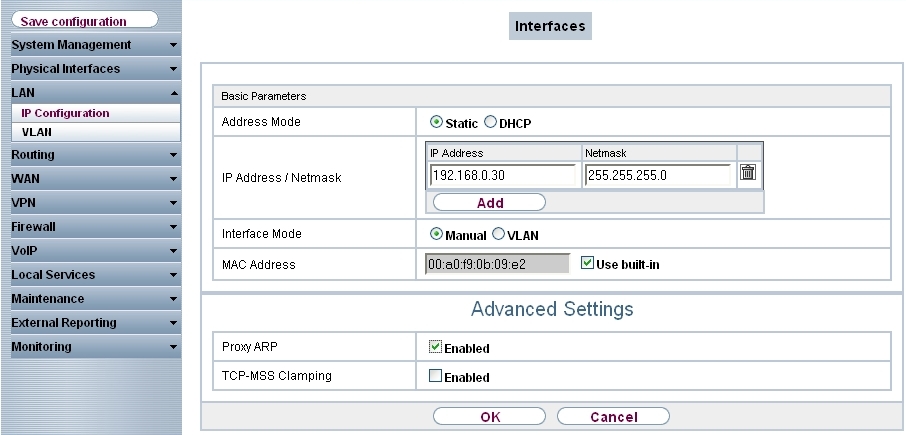
In our example, the VPN gateway is operated with IP address 192.168.0.30 . To assign the bintec secure IPSec client™ an IP address from this network range, the option Proxy ARP must be enabled.
For this, go to the following menu:
Go to
LAN -> IP Configuration -> Interfaces -> <en1-0>
.
LAN -> IP Configuration -> Interfaces -> <en1-0>
Relevant fields in the Interfaces menu
| Field | Description |
|---|---|
| IP Address/Netmask | With Add, add a new address entry and enter the IP Address and corresponding Netmask of the interface. |
| Proxy ARP | Enable the option Proxy ARP. |
With the settings in the
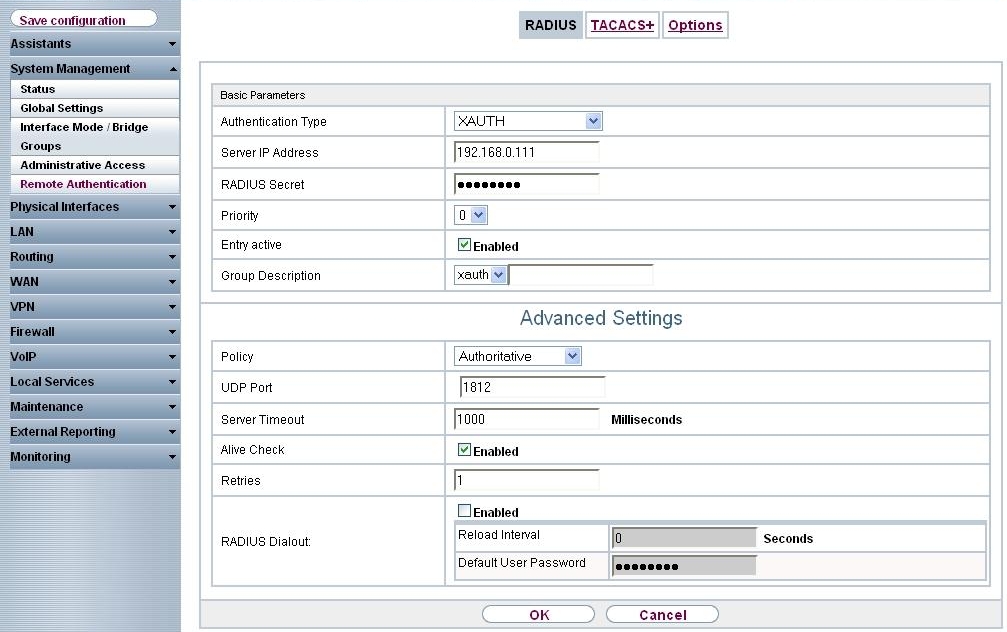
RADIUS menu, advanced IPSec authentication (XAuth) with the RADIUS server of the
KOBIL SecOVID™ server is enabled. You must set the authentication type to the
XAUTH
value, and save the IP address of the
KOBIL SecOVID™ server. Communication with the RADIUS server is password-protected.
Here, please use the RADIUS password saved on the SecOVID server (configuration file
\etc\SecOVID\clients).
Go to System Management -> Remote Authentication -> RADIUS.
System Management-> Remote Authentication -> RADIUS
| Field | Description |
|---|---|
| Authentication Type | Select Authentication Type XAUTH . |
| Server IP Address | Enter the server IP address of the KOBIL SecOVID™ server. |
| RADIUS Password | Enter the shared password used for communication between the RADIUS server and your device, e.g. radius_PWD . |
|
Group description |
Define a new RADIUS group description or assign the new RADIUS entry to a predefined group. The configured RADIUS servers for a group are queried according to priority and policy. Possible values:
|
An IP address pool is specified in the IP Pools menu, from which an address in assigned all VPN clients at tunnel setup. In our example, a range from the local network is selected, e.g. 192.168.0.150 to 192.168.0.180 .
Go to VPN -> IPSec -> IP Pools -> Add.

VPN -> IPSec -> IP Pools -> Add
Relevant fields in the IP Pools menu
| Field | Meaning |
|---|---|
| IP pool name | Enter the name of the IP pool. |
| IP pool range |
In the first field, enter the first IP address from the local network. In the second field, enter the last IP address from the local network. |
A RADIUS server must be used for advanced IPSec authentication (XAuth). Perform all necessary settings in the XAuth Profile menu.
Go to VPN -> IPSec -> XAUTH Profiles -> New.

VPN -> IPSec -> XAUTH Profiles -> New
Relevant fields in the XAUTH Profiles menu
| Field | Meaning |
|---|---|
| Description | Enter a description for the IPSec authentication, e.g. radius . |
| Role | Here, select Server . |
| Mode | Under Mode select RADIUS . |
| RADIUS Server Group ID | Select RADIUS server xauth . |
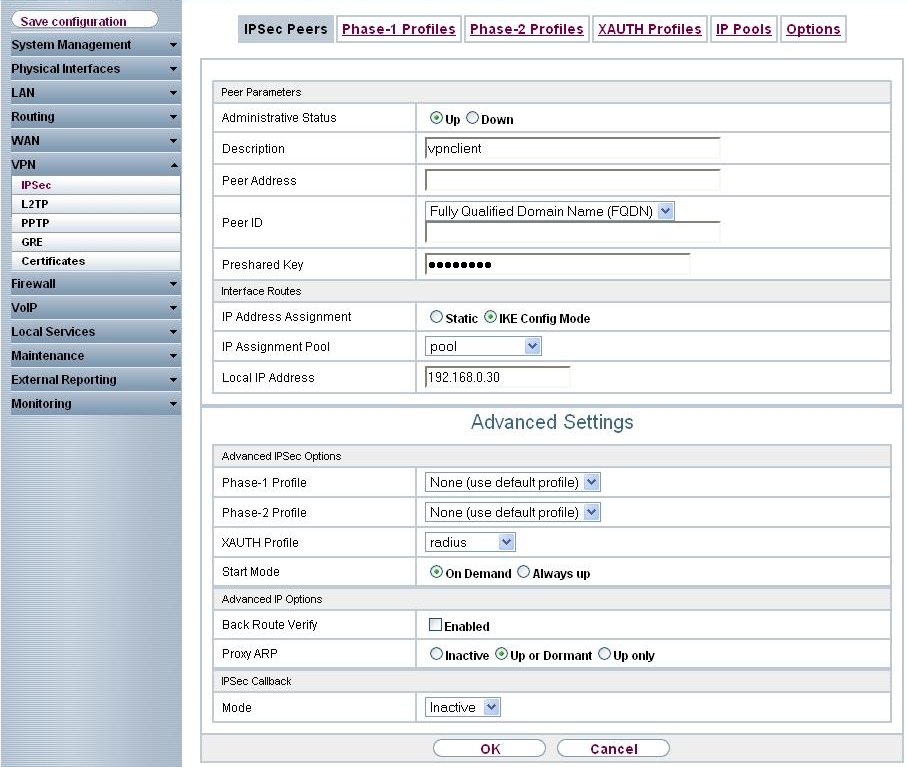
In the IPSec Peersmenu, a multiuser VPN connection is configured, allowing connection setup of several bintec secure IPSec clients™. If the VPN IPsec connection with preshared keys is to be authenticated, the same preshared key is used on all bintec secure IPsec clients™. For the multiuser VPN connections, no ID information is saved in the Peer ID field.
Choose the New button to set up the IPSec peer.
Go to
VPN -> IPSec -> IPSec Peers ->
.
VPN -> IPSec -> IPSec Peers ->
| Field | Meaning |
|---|---|
| Administrative Status | Set Administrative Status to Active. The peer is available for setting up a tunnel immediately after saving the configuration. |
| Description | Enter a description of the peer that identifies it. |
| Peer ID | Select the ID type.
Possible ID types:
|
| Preshared Key | Under Preshared Key enter the password agreed with the peer. |
| IP Address Assignment |
Select the configuration mode of the interface. When selecting the option IKE Config Mode choose an IP address from the configured IP pool. |
| IP Assignment Pool | Select an IP pool configured in the VPN -> IP Pools menu. If an IP pool has not been configured here yet, the message Not yet defined appears in this field. |
| Local IP Address | Enter the WAN IP address of your IPSec tunnel. This can be the same IP address as the address configured on your router as the LAN IP address. |
The Advanced Settings menu consists of the following fields:
Relevant fields in the menu Advanced Settings
| Field | Meaning |
|---|---|
| Phase 1 Profile | If selecting None (use standard profile) the profile indicated as standard in Phase 1 Profiles is used. |
| Phase 2 Profile | When selecting None (use standard profile) the profile indicated as standard in Phase 2 Profiles is used. |
| XAUTH Profile | Here, select a configured XAUTH profile (e.g. radius ). |
| Start mode | Here, you can select how the peer is to be switched to the active state. By selecting On Demand the peer is switched to the active state with a trigger. |
| Back Route Verify | Here, it is determined whether a check on the back route should be enabled for the interface to the connection partner. |
| Proxy ARP |
Set Proxy ARP to Up or Dormant . Your device only responds to an ARP request if the status of the connection to the IPSec peer is up or dormant. In the case of Dormant , your device only responds to the ARP request; the connection is not set up until someone actually wants to use the route. |
| Mode | Set the Mode of the IPSec callback to Inactive . The local device neither reacts to incoming ISDN calls nor initiates ISDN calls to the remote device. |
In the
Phase 1 Profiles menu, aggressive mode is enabled and the
local ID value of the VPN gateway is set. Click on the
icon
to edit existing entries. Select the
New button to create new profiles.
Go to
VPN -> IPSec -> Phase 1 Profiles -> Edit
.

VPN -> IPSec -> Phase 1 Profiles -> Edit
Relevant fields in the Phase 1 Profiles menu
| Field | Meaning |
|---|---|
| Mode |
Select Phase 1 mode Aggressive . The Aggressive Mode is necessary if one of the peers does not have a static IP address and preshared keys are used for authentication; it requires only three messages for configuring a secure channel. |
| Local ID Value | Enter the VPN gateway ID, e.g. vpngateway.bintec-elmeg.com |
Settings in the
VPN -> IPSec -> Phase 2 Profiles-> Edit
can be taken over unchanged.

VPN -> IPSec -> Phase 2 Profiles -> Edit
| Copyright© Version 01/2020 bintec elmeg GmbH |