-
Go to Physical Interfaces -> ISDN Ports -> ISDN Configuration-> <pri2-4 (TE)>
 .
.
The configuration for the bintec RT4402 |
In our example, the GUI can be accessed on the IP address 192.168.0.1.
First, set up the S2M interface on the device. To do this, go to the following menu:
Go to
Physical Interfaces -> ISDN Ports -> ISDN Configuration-> <pri2-4 (TE)>
.

Physical Interfaces -> ISDN Ports -> ISDN Configuration -> <pri2-4 (TE)>
Proceed as follows:
Under Port Usage, select the protocol that you wish to use for the ISDN port, in this case EURO ISDN S2M (TE) .
Under ISDN Line Framing, select CRC4 (Standard) .
Under P-P Base Number, enter the base number for the connection, e. g. 1234 .
Under Channel Selection, select Any Channel . The device tells the PABX that any channel is possible. The exchange of the PABX selects the channel to be used.
Confirm with OK.
Next, the access data for the elmeg hybird 300/600™ is configured on the bintec RT4402™. To do this, go to the following menu:
Go to VoIP -> Media Gateway -> SIP Accounts -> New.

VoIP -> Media Gateway -> SIP Accounts -> New
Proceed as follows:
Under Description, enter any name for the SIP account, e. g. Hybird .
Enable the Administrative Status.
Set the Trunk Mode to Server . The media gateway is operated as a server.
Specify the User Name, e. g. hybird .
Under Authentication ID, enter a name that is to be used for the authentication, e. g. hybird .
Specify a Password, e. g. supersecret .
Enable the Registration option.
Under Validity, enter the time in seconds after which the current registration becomes invalid so that a new registration request is sent, here e. g. 600 .
Set SIP Header Field(s) for Caller Address to Display and User Name . The so-called "p-preferred-identity" field is added to the SIP header so that it can transmit the sender ID there.
Leave the remaining settings unchanged and confirm them with OK.
In the Advanced Settings menu you can, if you wish, make Codec Settings or Voice Quality Settings.
In the Call Routing menu, you can specify the conditions for routing calls. Define a list with rules or rule chains that are used to manipulate the indicated destination numbers.
Go to VoIP -> Media Gateway -> Call Routing -> New.

VoIP -> Media Gateway -> Call Routing -> New
Proceed as follows:
Under Description, enter the name of the entry, e. g. Exchange to hybird .
Enable the Administrative Status.
Under Type, select Allow . The calls are forwarded.
Under Calling Line, select the pri2-4 S2M line that has been configured.
Under Calling Address you can restrict the application of the entry to a particular caller.
Under Called Address enter 1234* . The * symbol means that, at the end of a character string, any other characters may follow. Any calls that come into the bintec RT4402™ with the root number 1234 are put through to elmeg hybird 300/600™.
You add a routing rule with Add.
To specify the order of the filtering rules, under Priority enter, e. g., 1 .
Enable the Administrative Status.
Under Line, select the SIP account for the outgoing call, here Hybird .
Under Called Address Translation, you can enter how the number is to be manipulated before it is used for dialling.
Confirm with OK.
Next, a second route is set up which routes the connection from the elmeg hybird 300/600™ to the exchange.
Go to VoIP -> Media Gateway -> Call Routing -> New.

VoIP -> Media Gateway -> Call Routing -> New
Proceed as follows:
Under Description, enter the name of the entry, e. g. hybird to exchange .
Enable the Administrative Status.
Under Type, select Allow .
Under Calling Line, select the description of the SIP account for the elmeg hybird 300/600™ e. g. hybird .
Under Calling Address you can restrict the application of the entry to a particular caller.
Under Called Address enter * for outgoing connections.
You add a routing rule with Add.
To specify the order of the filtering rules, under Priority enter, e. g., 1 .
Enable the Administrative Status.
Under Line, select the line to which the call is to be routed, here pri2-4 .
Called Address Translation may be left empty if the number does not need to be modified.
Confirm with OK.
In the final step, the media gateway is enabled. To do this, go to the following menu:
Go to VoIP -> Media Gateway -> Options.
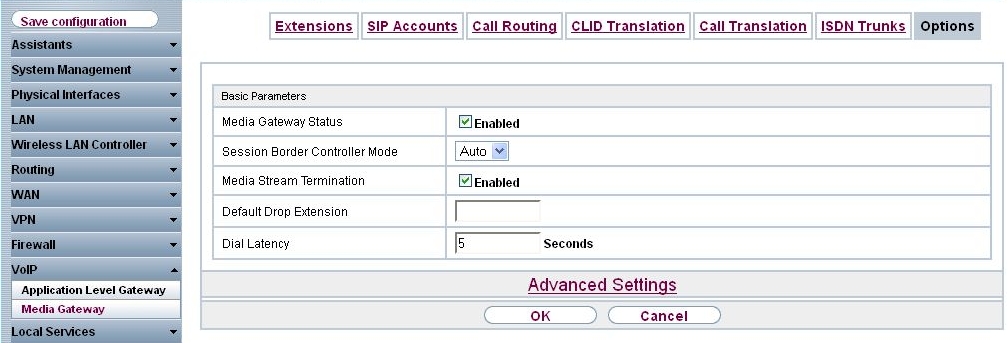
VoIP -> Media Gateway -> Options
Proceed as follows:
Enable the status of the media gateway.
Set the Session Border Controller Mode to Auto . The session border controller does the call routing for all the extensions that exactly match an existing SIP account.
Enable the Media Stream Termination function. The RTP sessions are terminated on the media gateway.
Under Dialling break, enter the maximum delay time before the system assumes the call number entered is complete and starts the SIP dialling process, e. g. 5 seconds. This timeout is reset each time that a button is pressed.
Confirm with OK. The media gateway is now enabled.
This concludes the configuration on the bintec RT4402™. To create a bootable backup of the configuration, exit the GUI™ with Save configuration and confirm with OK.
| Copyright© Version 01/2020 bintec elmeg GmbH |