
Terminals -> elmeg System Phones -> elmeg IP1x
Connecting an elmeg IP120telephone (Variants 1-3) |
When the elmeg IP120™ telephone has been connected as shown in the circuit diagram, the phone's automatic detection begins. After this, any newly detected elmeg IP1x0™ telephones will be listed in the configuration interface of the elmeg hybird 120j™.
Go to Terminals -> elmeg System Phones -> elmeg IP1x.
Terminals -> elmeg System Phones -> elmeg IP1x
In the next step, the elmeg IP120™ telephone that has been detected automatically is assigned to a user or to a local number.
Go to
Terminals -> elmeg System Phones -> elmeg IP1x
 .
.

Terminals -> elmeg System Phones -> elmeg IP1x
Proceed as follows:
Enter a Description for the telephone, e.g. Telephone-2 .
For a local terminal, select the predefined Location LAN . This then enables the operation of an elmeg IP120™ telephone from the separate network.
For Variant 3, enable the IP/MAC Connection option. Thanks to this option, the displayed IP address is then reserved for this terminal. This option must be enabled in order to ensure the smooth operation of the elmeg IP1x0™. The option is not visible in Variants 1 and 2 as an external DHCP server is used.
For Internal Numbers, click Add and select the number 31 (#31) .

|
Note |
|---|---|
|
For elmeg IP 120™ / elmeg IP 130™ / elmeg IP 140™, up to 4 internal numbers can be configured. |
|
Press OK to confirm your entries.
The settings are saved in the system and transferred to the telephone.
Once the data is transmitted to the elmeg IP120™ telephone, the internal number status display is displayed with a green arrow. By doing this, the telephone is then ready for operation on the system.
|
|
Note |
|---|---|
|
When operating the elmeg IP1x0™ telephone for the first time, it is necessary to set the language on the terminal. |
|
Results:

Terminals -> elmeg System Phones -> elmeg IP1x
The user of your system is configured in the User Settings menu.
Go to
Numbering -> User Settings -> <User 31>
-> Basic Settings.

Numbering -> User Settings -> <User 31>
-> Basic Settings
Proceed as follows:
For a better overview, the Name of the user can be assigned, e.g. Bloggs-31 .
Leave the remaining settings unchanged and confirm them with Apply.
In the Numbers submenu, the subscriber with the internal number 31 can be assigned a name for a better overview.
Go to
Numbering -> User Settings -> <User 31>
-> Numbers.

Numbering -> User Settings -> <User 31>
-> Numbers
Proceed as follows:
Enter the name of the user under Displayed Description, e.g. Bloggs-31 .
Check the System Phonebook option. The configured name and the corresponding internal number are then transferred to the system telephone book.
Press Apply to confirm your entries.
Now the Outgoing Signalisation submenu specifies which external number is to be signalled for this user on outgoing calls. Here, select one of the multiple subscriber numbers (MSNs) that have been configured.
|
|
Note |
|---|---|
|
If no external number is defined for the internal number, then any outgoing external calls are signalled with the first number of the point-to-multipoint connection. |
|
Go to
Numbering -> User Settings -> <User 31>
-> Outgoing Signalisation <31>
.
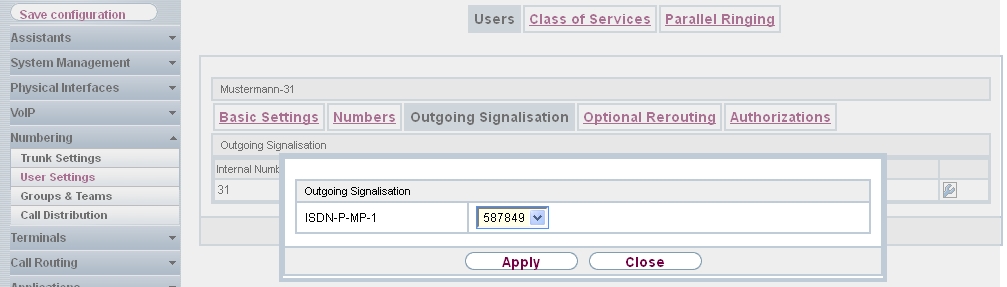
Numbering -> User Settings -> <User 31>
-> Outgoing Signalisation <31>
Proceed as follows:
Under ISDN External, select one of the multiple subscriber numbers (MSN) already configured, e. g. 587849 .
Confirm with Apply.
In the next configuration step, you define the incoming distribution, i.e. specify with which external number the user Bloggs-31 can be reached.
Go to
Numbering -> Call Distribution -> Incoming Distribution
.

Numbering -> Call Distribution -> Incoming Distribution
Proceed as follows:
Under Assignment, select Internal Number .
For Internal Number, select 31 (Bloggs-31) .
Confirm with OK.
Results:

Numbering -> Call Distribution -> Incoming Distribution
| Copyright© Version 01/2020 bintec elmeg GmbH |