
VPN->IPSec->XAUTH Profiles->New
Creating / changing iPhone-specific parameters |
The iPhone requires special IPSec settings as well as a XAUTH profile.
Go to the VPN->IPSec->XAUTH Profiles->New menu.
VPN->IPSec->XAUTH Profiles->New
Proceed as follows:
Enter a Description for the XAUTH profile, e.g. XAUTH-Pool .
Regarding the Role, select Server .
Regarding the Mode, select Local .
To better distinguish between the names of the IPSec peers, when under Users and then Name enter e.g. iPhone_xauth .
Enter the authentication password (Password).
Confirm with OK.
In the next step, it is necessary to adjust the profile for phase 2.
Go to the VPN->IPSec->Phase-2 Profiles menu.

VPN->IPSec->Phase-2 Profiles
Click on the
 symbol to process the configured
wz_ipsec_1
profile.
symbol to process the configured
wz_ipsec_1
profile.

VPN->IPSec->Phase-2
Profiles
Proceed as follows:
When on Proposals select Authentication SHA1 .

|
Note |
|---|---|
|
It is important NOT to select SHA2! |
|
Disable the Use PFS Group option.
Click OK to confirm your entries.
The profile for phase 2 must also be adapted just as for phase 1.
Go to the VPN->IPSec->Phase-1 Profiles menu.

VPN->IPSec->Phase-1 Profiles
Click on the
symbol to process the configured
wz_ike_1
profile.

VPN->IPSec->Phase-1
Profiles
Proceed as follows:
When on Proposals select Authentication SHA1 .
|
|
Note |
|---|---|
|
It is important NOT to select SHA2! |
|
Select DH Group 2 (1024 Bit) .
Click Advanced Settings.
Under Alive Check select the Dead Peer Detection (Idle) option.
Click OK to confirm your entries.
The IPSec peer must then be adapted.
Go to the VPN->IPSec->IPSec Peers menu.

VPN->IPSec->IPSec Peers
Click on the
symbol to process the configured
iPhone dial-in
profile.

VPN->IPSec->IPSec
Peers
Proceed as follows:
Using the drop-down menu in Peer ID select the Key ID value.
Click Advanced Settings.
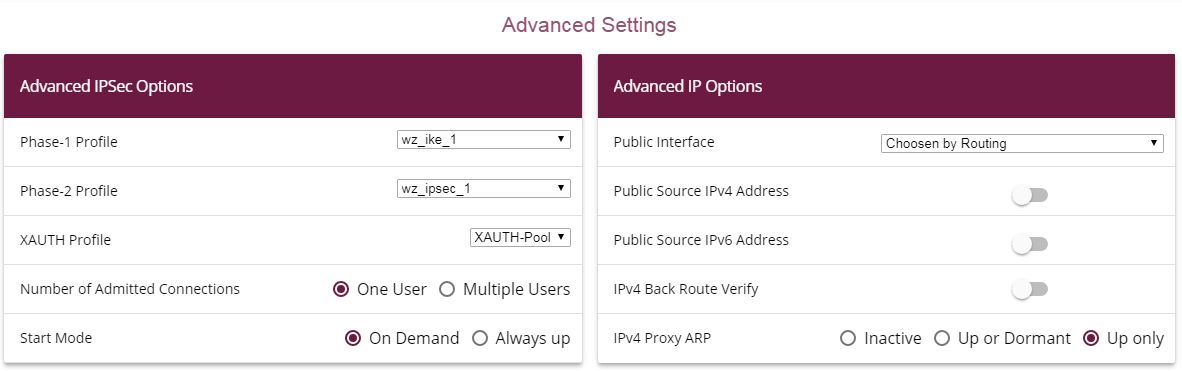
VPN->IPSec->IPSec
Peers->
->Advanced Settings
Check whether the following values were selected:
Phase-1 Profile: wz_ike_1
Phase-2 Profile: wz_ipsec_1
XAUTH Profile: in this case XAUTH pool (the XAUTH profile that was set up)
Under IPv4 Proxy ARP select the Up only option.
Click OK to confirm your entries.
The DNS server must be entered into the DHCP pool so that the iPhone can carry out a DNS resolution.
To do so, go to the Local Services->DHCP Server->IP Pool Configuration menu.

Local Services->DHCP Server->IP Pool Configuration
Click the
symbol to edit the
internal DHCP address range
.

Local Services->DHCP
Server->IP Pool
Configuration
Proceed as follows:
Under DNS Server enter the primary IP address of the DNS server. Under normal circumstances this is the be.IP™ IP address. The IP address is 192.168.0.1 as a default.
Click OK to confirm your entries.
This concludes the configuration. Save the current configuration using the button Save configuration as a boot configuration.
| Copyright© Version 01/2020 bintec elmeg GmbH |