
Local Services -> DHCP Server -> IP Pool Configuration -> New
DHCP configuration |
Now the two DHCP pools are created for the virtual interfaces en1-0-1 (VLAN ID 15) and en1-0-2 (VLAN ID 16).
Go to Local Services -> DHCP Server -> IP Pool Configuration -> New to configure the IP pool.
Local Services -> DHCP Server -> IP Pool Configuration -> New
Proceed as follows:
For IP Pool Name, enter any description to name the IP pool in a unique way, e. g. Employee .
For IP Address Range, enter the first (first field) and the last (second field) IP address in the IP address pool, e. g. 192.168.15.10 - 192.168.15.110 .
Confirm with OK.
In the Local Services -> DHCP Server -> DHCP Configuration -> New menu, you can perform additional configuration.
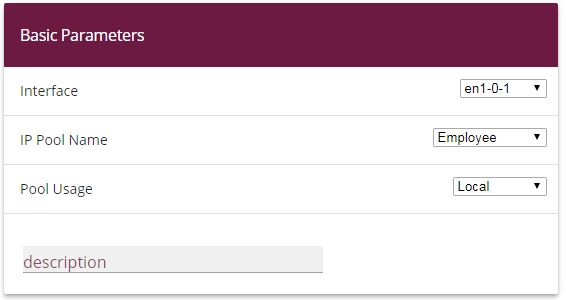
Local Services -> DHCP Server -> DHCP Configuration -> New
Proceed as follows:
Select the Interface en1-0-1 .
Select a valid IP-Pool Name, here e. g. Employee .
For Pool Usage, select Local . The DHCP pool is only used for DHCP requests in the same subnet.
Confirm with OK.
Now create another DHCP pool for the second virtual interface en1-0-2 (VLAN ID 16).
Go to Local Services -> DHCP Server -> IP Pool Configurationl -> New.
For IP Pool Name, enter e. g. Guest .
For IP Address Range, enter the IP address of the IP address pool, e. g. 192.168.16.10 - 192.168.16.110 .
Confirm with OK.
Go to Local Services -> DHCP Server -> DHCP Configuration -> New.
Select the Interface en1-0-2 .
Select a validn IP Pool Name, here e. g. Guest .
For Pool Usage, select Local .
Confirm with OK.
The complete configuration looks like this:

Local Services -> DHCP Server -> DHCP Configuration
| Copyright© Version 08/2020 bintec elmeg GmbH |