Configure the bintec RS123 at Location B (Field Office) |
First set up a new connection. The IPSec Phase 1 / IPSec Phase 2 standard profiles are used in the example.
To do this, go to the following menu:
Go to VPN -> IPSec -> IPSec Peers -> New.

VPN-> IPSec-> IPSec Peers-> New
To add a new connection, proceed as follows:
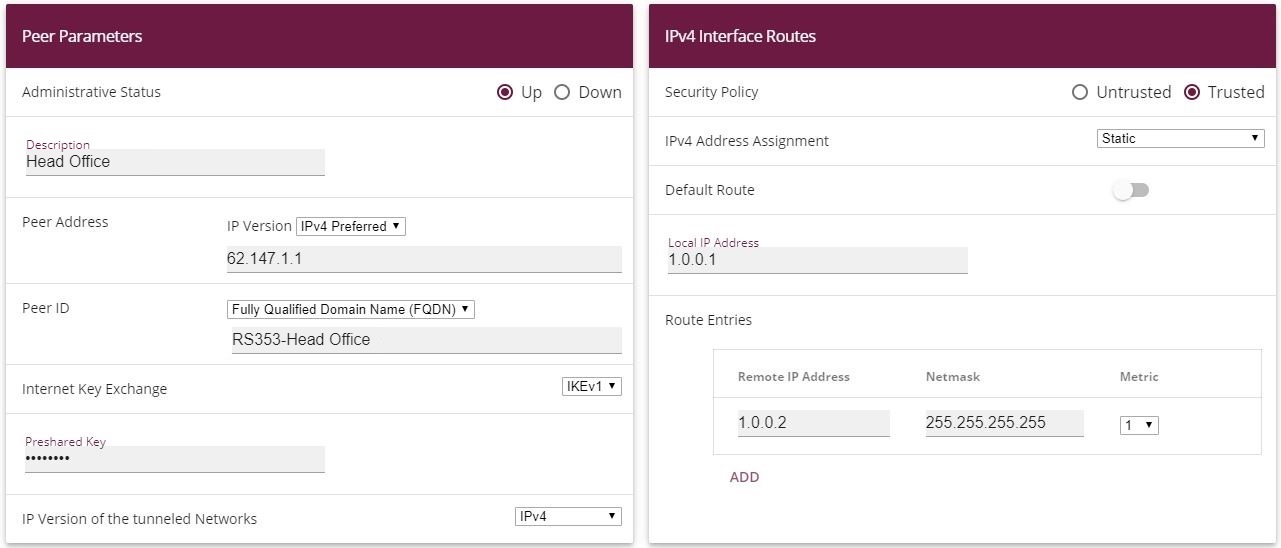
For Description, enter a description of the peer which identifies it, e. g. Head Office .
For Peer Address, enter the public Internet IP address, e. g. 62.147.1.1 .
For Peer ID, enter the peer's ID, e. g. RS353-Head Office .
For Preshared Key, enter the password for the encrypted connection (e. g. test .
The Local IP Address specifies the IP address of the IPSec interface, here e. g. 1.0.0.1 .

|
Note |
|---|---|
|
Here, do NOT enter the LAN IP address of the bintec RS123™, but use an IP address which is NOT within a location's LAN IP address range. |
|
The local IP address of the head office's IPSec interface should be configured as the Route Entry, here e. g. 1.0.0.2 . In this case, the subnet mask can be 255.255.255.255 (host route).
|
|
Note |
|---|---|
|
Here, do NOT enter the actual network routes for accessing the remote location. The creating of the network routes that are required to access the locations concerned is done, in our case, by the RIP routing protocol. |
|
The Start Mode must be configured to Always up konfiguriert sein. In this mode, the IPSec connection is always established automatically, i. e. the connection is always active. This is needed so that RIP can transmit the routes to the relevant neighbour gateway.
Leave the remaining settings unchanged and confirm them with OK.
To configure the Phase 1 profile, open the profile that is indicated to be the default.
Go to
VPN -> IPSec -> Phase 1 Profiles ->
 .
.

VPN -> IPSec -> Phase 1 Profiles ->
Proceed as follows:
For Local ID value, enter the your device's ID, here e. g. RS123-Field Office-1 .
Leave the remaining settings unchanged and confirm them with OK.
The routing protocol is configured in the RIP Interfaces menu.
Go to
Routing Protocols -> RIP -> RIP Interfaces -><Head Office>
.

Routing Protocols -> RIP -> RIP Interfaces -><Head Office>
.
Proceed as follows:
For the Send Version, select RIP V2 Multicast . The RIP protocol packets use the 224.0.0.9 multicast address as the target address. You may also use other RIP variants here. But it is important that the RIP version used (RIPv1/RIPv2) is the same on both VPN gateways.
For the Receive Version, select RIP V2 .
For Route Announce, select Up or Dormant .
Press OK to confirm your entries.
In the last step in the configuration, the default route distribution is disabled.
Go to Routing Protocols -> RIP -> RIP Options.

Routing Protocols ->RIP->RIP Options
Proceed as follows:
Disable the Default Route Distribution parameter. This prevents the configured default route being propagated via RIP.
Confirm with OK.
This completes the configuration of the bintec RS123™ gateway.
| Copyright© Version 08/2020 bintec elmeg GmbH |